The Three Transition Principles
- Every transition needs a visual break: A trim board (minimum 1×3), a metal reveal, or a deliberate shadow gap signals "intentional design change" rather than "ran out of material." Never butt two different profiles directly against each other without a mediating element.
- Water must be directed outward at every horizontal transition: Where upper siding meets lower siding at a profile change, Z-flashing or a drip edge must prevent water from the upper section entering behind the lower section. This is identical in principle to window head flashing.
- Coursing should align at key sight lines: Where two profiles meet at a vertical trim board, horizontal courses should align (or be deliberately offset by half-course) for visual coherence. Random misalignment reads as error.
Common Transition Types
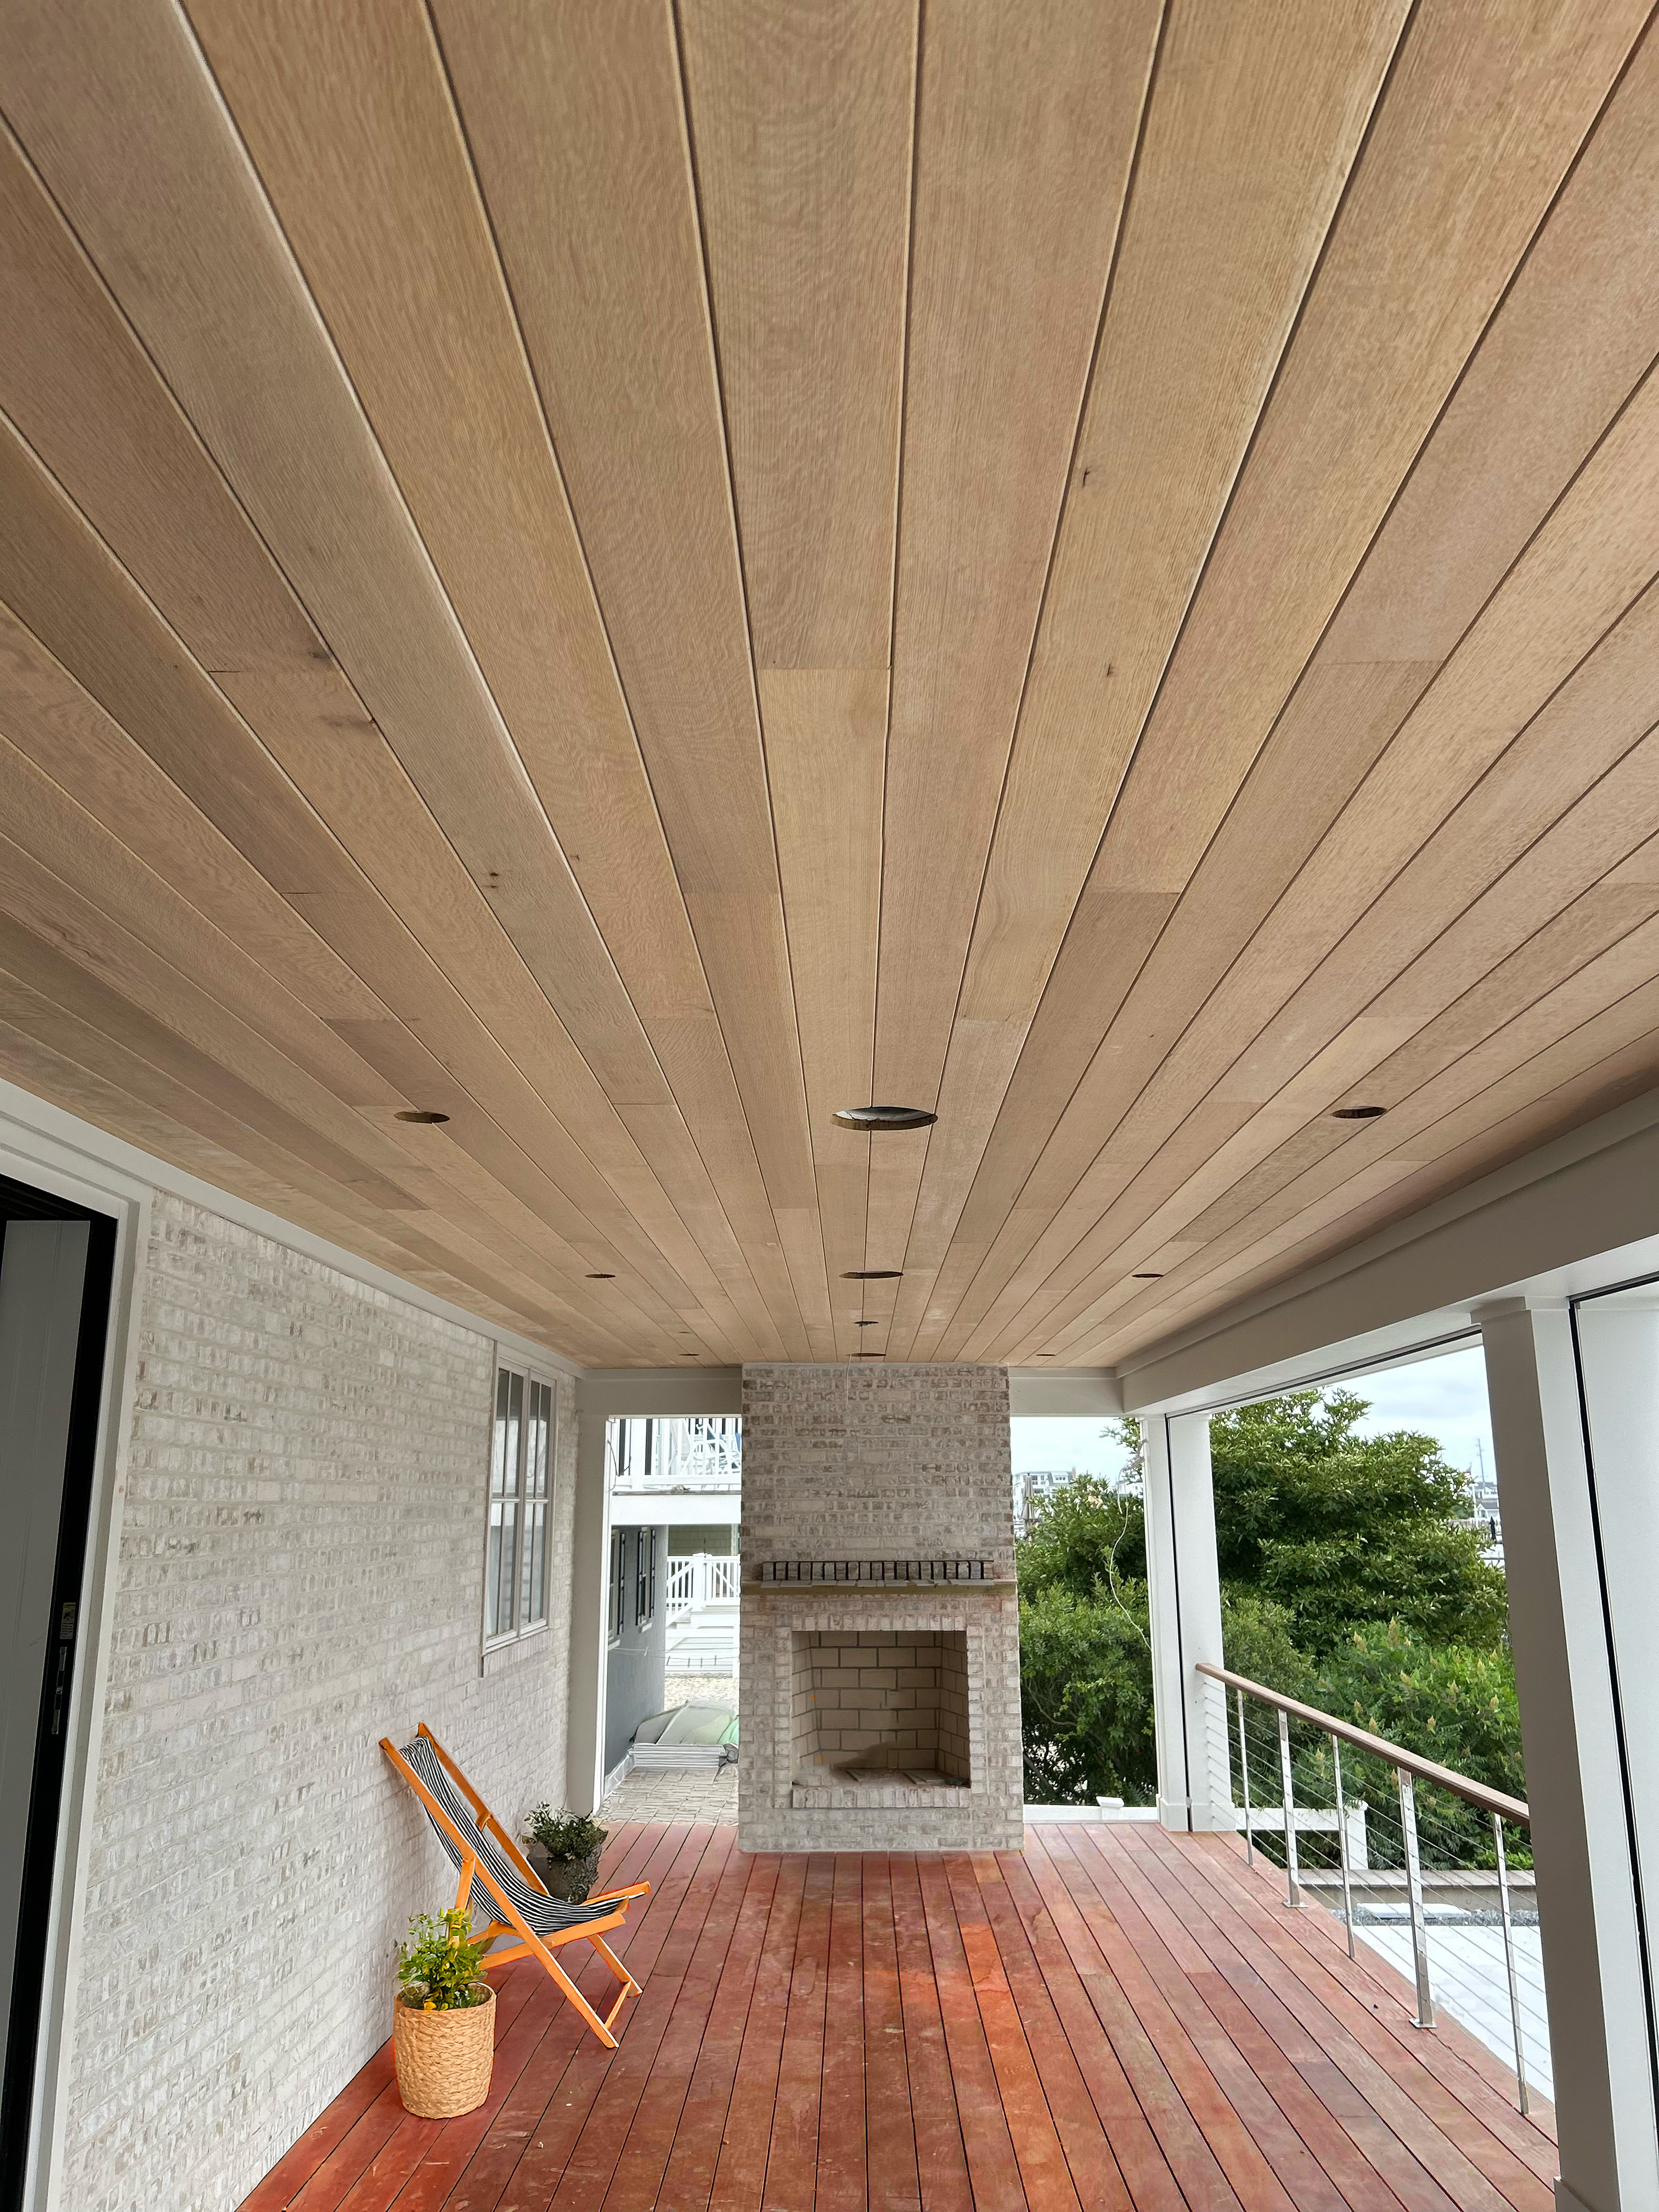
Horizontal-to-Vertical (Most Common)
The modern farmhouse signature: horizontal siding below, vertical board-and-batten above (or on a projecting volume). The transition typically occurs at a horizontal trim board at door-head height or second-floor line.
- Detail: Horizontal 1×4 or 1×6 trim board at the transition line. Z-flashing behind the trim's top edge, directing water over the trim face and down the lower siding. Upper vertical siding sits on top of the trim board with 1/8" gap.
- Species note: The trim board should match or complement both profiles. If mixing species (e.g., cedar B&B above, TM ash horizontal below), a painted trim board in a contrasting color can unify the composition.
Profile-to-Profile (Same Orientation)
Changing from shiplap to channel, or channel to nickel-gap, on the same wall plane. Less common but used to create subtle texture variation on large facades.
- Detail: A vertical 1×3 trim board at the change point, with siding terminating 1/4" from each side of the trim and sealed with flexible sealant. Rainscreen cavity continues uninterrupted behind both profiles.
- Alignment: Course lines MUST align across the trim board. Different profiles often have different face heights — calculate coursing module before ordering to ensure alignment at the transition.
Wood-to-Different-Material
Wood siding meeting stucco, stone, fiber cement, or metal panel. The critical concern: different materials have different thermal expansion rates and moisture behavior.
- Detail: Never butt wood directly against dissimilar materials. Use a J-channel, shadow gap, or trim board as a mediating element. Allow 3/8" minimum gap between wood and non-wood materials for differential movement.
- Flashing: Continuous metal flashing at any horizontal material-change line. The upper material's WRB must lap over the flashing; the lower material tucks behind it.
"The transition detail is where good projects separate from great ones. I see a lot of architects draw mixed siding on elevations without thinking about the 3D junction. Every orientation change, every material change needs a plan for: how does water cross this line without getting in? And how does the eye read this as intentional? A $4 trim board and $2 of flashing tape answers both questions."
— Norm Moton, Director of Sales, J. Gibson McIlvain Co.
For mixed-orientation design strategies, see our modern farmhouse profiles guide. For vertical siding specifics, see our vertical siding guide.
How McIlvain Would Specify This for a Real Project
For McIlvain, How to Transition Between Two Different Wood Siding Profiles on the Same Building Exterior is not just a product-selection question. It is a specification question that has to connect profile selection for residential and commercial exterior cladding with the way the material will be milled, shipped, handled, fastened, and maintained. The right answer starts with exterior wood siding profiles, but it only becomes reliable when the species, profile, finish, wall assembly, and field sequencing are written into the same scope.
The practical decision is usually governed by water shedding, reveal depth, shadow line, board width, and milling repeatability. A profile that looks correct in a rendering can fail in service if the board width is too aggressive for the species, if the fastener schedule fights seasonal movement, or if the wall has no drying path behind the siding. That is why McIlvain treats exterior wood as a system: the lumber order, the milling profile, the jobsite details, and the finish schedule all have to support the same performance target.
Species choice should also be tied to the owner’s tolerance for maintenance. Cedar, Cypress, Sapele, Accoya, and thermally modified ash depending on profile tightness and exposure can all be correct in the right setting, but they do not age, move, or accept finishes the same way. A project that wants a natural silver-gray patina needs different expectations than one that needs a dark factory finish for ten years. A coastal project needs a different fastener and wash-down conversation than a protected inland facade. Those distinctions are where a specialty lumber supplier adds value beyond simply quoting a board price.
Performance and Procurement Checklist
| Item | Why it matters |
|---|---|
| Exposure class | Confirm rain, salt, UV, freeze-thaw, and wall orientation before selecting species. |
| Profile and movement | Match board width, reveal, overlap, and fastening method to the species movement profile. |
| Grade and appearance | Specify clear, vertical-grain, mixed-grain, or architectural grade rather than relying on generic “premium” language. |
| Moisture content | Require a target moisture range and acclimation plan before installation. |
| Milling tolerance | Hold profile geometry, reveal width, and end-match details consistent across the order. |
| Submittals | Review samples, finish schedule, fastener type, and rainscreen details before release. |
Where Specifications Usually Fail
The most common failure is selecting a profile by name without matching the actual milled geometry to the climate and design intent. In practice, that means the drawings may show wood siding, the finish schedule may name a color, and the wall section may show a rainscreen, but nobody has confirmed whether the actual boards can be sourced, milled, and installed in a way that satisfies all three. When that gap is discovered after framing or after the material arrives, the project loses the ability to make a clean specification decision.
The second failure point is ventilation, end-grain sealing, stainless fasteners, and moisture-content control. Exterior wood is forgiving when water can drain and the boards can dry; it is unforgiving when water is trapped at laps, end cuts, trim returns, or fastener penetrations. Every outside corner, window head, sill, soffit return, and transition between profiles should be reviewed as part of the siding package. If the detail cannot be drawn clearly, it usually cannot be installed consistently by a crew under schedule pressure.
The third failure point is substituting material late. A lower-cost species or a similar-looking profile may appear harmless on a spreadsheet, but the substitution can change shrinkage, finish behavior, fastener holding, and service life. McIlvain’s strongest recommendation is to approve physical samples, profile mockups, and finish samples before release, not after the first bundle is opened on site.
Ordering Information to Resolve Before Pricing
- Exposure: inland, coastal, shaded, south-facing, high-rise, WUI, or heavy rain-screen exposure.
- Profile: exact face width, reveal, overlap, tongue depth, kerf, drip edge, and whether the profile is intended for horizontal or vertical use.
- Finish: unfinished weathering, penetrating oil, factory prefinish, paint, or field-applied coating.
- Appearance: clear, near-clear, select knotty, vertical grain, mixed grain, color-matched bundles, or architect-reviewed samples.
- Assembly: furring thickness, WRB, clip system, screw type, corner trim, opening details, and ventilation path.
- Logistics: lead time, jobsite delivery sequence, board lengths, waste factor, attic/garage storage conditions, and replacement stock.
Related McIlvain Guidance and Next Steps
For a project that is close to specification, the next step is to compare the design intent against available species, profile tooling, finish schedule, and delivery timing. McIlvain can help translate a rendering or architectural detail into a practical lumber order, including sample selection and milling recommendations.
Frequently Asked Questions
How do you transition between horizontal and vertical siding?
Use a horizontal trim board (1x4 or 1x6) at the transition line with Z-flashing behind its top edge. Lower horizontal siding terminates below the trim; upper vertical siding sits on top with 1/8" gap. The trim board provides the visual break and the flashing manages water. Transition typically occurs at door-head height or floor lines.
Do you need trim between different siding profiles?
Yes — always provide a visual break (trim board, metal reveal, or deliberate shadow gap) between different profiles. Direct butting of different profiles reads as error rather than design intent. The trim also provides a practical location for flashing and sealant joints that accommodate differential movement between profile types.
How do you flash a siding transition?
Install Z-flashing at every horizontal profile transition. The upper leg tucks behind the upper section's WRB; the lower leg directs water over the trim or transition element and down the face of the lower siding. Identical in principle to window head flashing. At vertical transitions, continuous flexible sealant over backer rod between the siding edge and trim board.
Sources and Standards Referenced
- Building Science Corporation — Transition flashing details for mixed-cladding assemblies
- Western Red Cedar Lumber Association — Siding trim and transition installation standards
- International Code Council — IRC R703: Exterior covering transition requirements